Lean and Green Recipes
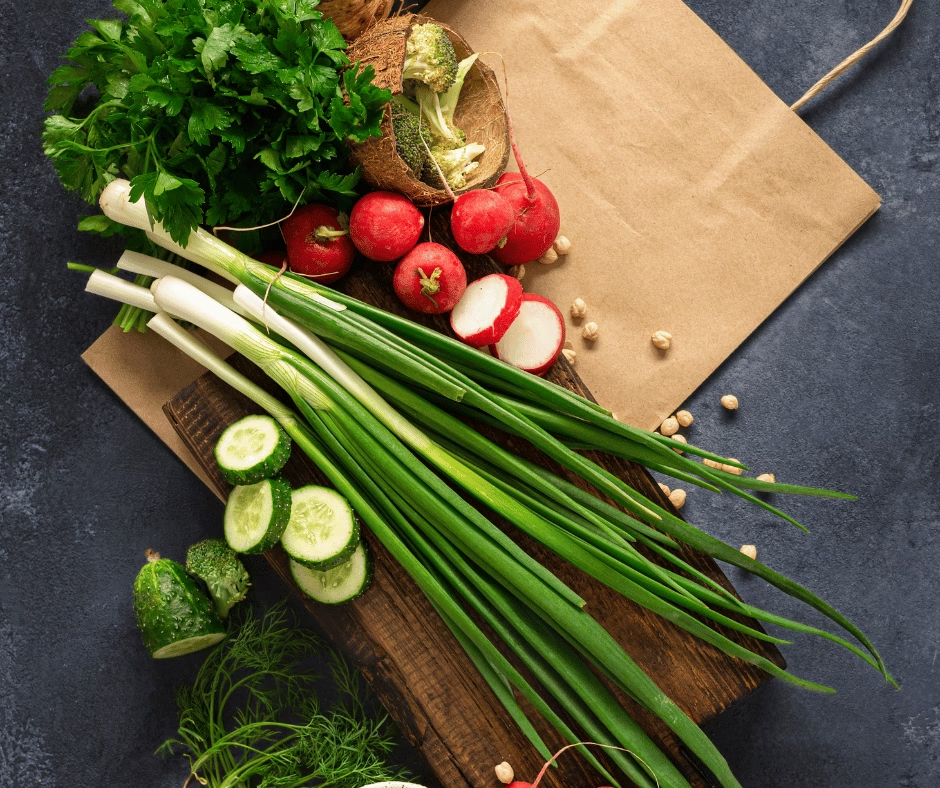
Lean and green recipes have become a trusted approach for people who want to eat healthier without sacrificing flavor.
They focus on lean proteins, fresh greens, and smart cooking methods that support energy, balance, and long-term wellness.
In the USA and Canada, more home cooks are choosing meals that feel light yet satisfying.
Not because of trends, but because these recipes work in real life.
This guide to lean and green recipes goes beyond basic salads and plain vegetables.
You’ll discover warming soups, herb-driven sides, vibrant greens, and simple techniques that turn everyday ingredients into meals worth repeating.
Each recipe is designed to be practical, flavorful, and easy to adapt whether your goal is weight management, clean eating, or simply cooking better meals at home.
What Are Lean and Green Recipes?
Lean and green recipes focus on two things:
- Lean proteins for strength and fullness
- Greens and vegetables for nutrients, color, and freshness
They are popular for weight management, energy, and heart health.
But the real win?
They taste incredible when done right.
Common Lean Proteins
- Chicken breast
- Fish
- Shrimp
- Eggs
- Plant proteins
Common Greens
- Spinach
- Arugula
- Green beans
- Herbs
- Pea sprouts
Why Lean and Green Recipes Work So Well
These meals check every box.
- Light but filling
- Easy to digest
- Quick to prepare
- Naturally low in calories
- Packed with micronutrients
They also adapt easily.
Vegan? No problem.
Gluten-free? Easy.
Low-calorie? Built-in.
8 Green Food Recipes
Green Deviled Eggs Recipe
These Green Deviled Eggs are a fun twist on the classic recipe, perfect for parties or gatherings. The vibrant green color comes from the addition of fresh herbs and avocado, making them not only delicious but also visually appealing!
Ingredients:
- 6 large eggs
- 1 ripe avocado
- 2 tablespoons mayonnaise
- 1 tablespoon Dijon mustard
- 1 tablespoon fresh lime juice (or lemon juice)
- 2 tablespoons fresh cilantro, finely chopped (or parsley for a milder flavor)
- 1 small jalapeño, seeded and finely chopped (optional, for a kick)
- Salt and pepper, to taste
- Paprika or chili powder, for garnish
- Extra cilantro leaves, for garnish (optional)
Instructions:
- Boil the Eggs:
- Place the eggs in a saucepan and cover them with cold water. Bring the water to a boil over medium-high heat. Once boiling, cover the pan, remove it from heat, and let it sit for 12 minutes.
- After 12 minutes, transfer the eggs to a bowl of ice water to cool for about 5-10 minutes. This will make peeling easier.
- Prepare the Filling:
- Once the eggs are cool, peel them and slice them in half lengthwise. Carefully remove the yolks and place them in a mixing bowl.
- Add the ripe avocado, mayonnaise, Dijon mustard, lime juice, chopped cilantro, and jalapeño (if using) to the bowl with the yolks. Mash everything together until smooth and creamy. Season with salt and pepper to taste.
- Fill the Egg Whites:
- Using a spoon or a piping bag, fill the egg white halves with the green yolk mixture. You can also use a zip-top bag with the corner snipped off for a more decorative presentation.
- Garnish:
- Sprinkle a little paprika or chili powder on top of each filled egg for color and flavor. If desired, add a small cilantro leaf on top for an extra touch.
- Serve:
- Arrange the Green Deviled Eggs on a platter and serve immediately, or refrigerate them for up to 2 hours before serving.
Fruit and Greens Salad with Herbs
This refreshing and vibrant salad combines the sweetness of fresh fruit with the crispness of greens and the aromatic flavors of herbs. Perfect as a side dish or a light main course!
Ingredients:
For the Salad:
- 4 cups mixed greens (such as spinach, arugula, and kale)
- 1 cup strawberries, hulled and sliced
- 1 cup blueberries
- 1 cup diced mango (or any seasonal fruit like peaches or apples)
- 1/2 cup cucumber, thinly sliced
- 1/4 cup red onion, thinly sliced
- 1/4 cup feta cheese or goat cheese (optional)
- 1/4 cup walnuts or pecans, toasted (optional)
For the Herb Dressing:
- 1/4 cup extra virgin olive oil
- 2 tablespoons apple cider vinegar (or lemon juice)
- 1 tablespoon honey or maple syrup (adjust to taste)
- 1 tablespoon fresh basil, finely chopped
- 1 tablespoon fresh mint, finely chopped
- 1 tablespoon fresh parsley, finely chopped
- Salt and pepper to taste
Instructions:
- Prepare the Greens:
- In a large salad bowl, add the mixed greens. Rinse and dry them thoroughly if needed.
- Add the Fruits and Vegetables:
- Gently toss in the sliced strawberries, blueberries, diced mango, cucumber, and red onion. If using, sprinkle the feta or goat cheese and toasted nuts on top.
- Make the Herb Dressing:
- In a small bowl or jar, combine the olive oil, apple cider vinegar (or lemon juice), honey (or maple syrup), chopped basil, mint, and parsley. Season with salt and pepper to taste.
- Whisk or shake well until the dressing is emulsified.
- Dress the Salad:
- Drizzle the herb dressing over the salad just before serving. Toss gently to combine, ensuring all ingredients are coated with the dressing.
- Serve:
- Serve immediately as a refreshing side dish or a light meal. Enjoy!
Tips:
- Feel free to customize the salad with your favorite fruits and nuts.
- For added protein, consider adding grilled chicken, chickpeas, or quinoa.
- This salad is best enjoyed fresh but can be stored in the refrigerator for a few hours if needed. Just keep the dressing separate until ready to serve to prevent the greens from wilting.
Shorbat Jarjir & Restorative Ginger Soup
Ingredients:
- For the Soup:
- 1 cup fresh jarjir (arugula) leaves, washed and chopped
- 1 medium onion, finely chopped
- 2 cloves garlic, minced
- 1 medium carrot, diced
- 1 medium potato, peeled and diced
- 1 teaspoon ground cumin
- 1 teaspoon ground coriander
- 1 teaspoon turmeric powder
- 1 tablespoon olive oil
- 4 cups vegetable or chicken broth
- Salt and pepper to taste
- Juice of 1 lemon (optional, for brightness)
- For the Ginger Infusion:
- 1 tablespoon fresh ginger, grated
- 1 teaspoon fresh ginger, minced (for garnish)
- 1 tablespoon fresh lemon juice (optional)
- Fresh parsley or cilantro for garnish
Instructions:
- Prepare the Base:
- In a large pot, heat the olive oil over medium heat. Add the chopped onion and sauté until translucent, about 5 minutes.
- Add the minced garlic and grated ginger, cooking for an additional minute until fragrant.
- Add Vegetables:
- Stir in the diced carrot and potato, cooking for another 5 minutes. This will help to soften the vegetables and enhance their flavors.
- Spice It Up:
- Add the ground cumin, ground coriander, turmeric powder, salt, and pepper. Stir well to coat the vegetables with the spices.
- Add Broth:
- Pour in the vegetable or chicken broth, bringing the mixture to a boil. Once boiling, reduce the heat and let it simmer for about 15-20 minutes, or until the vegetables are tender.
- Incorporate Jarjir:
- Add the chopped jarjir (arugula) leaves to the pot and simmer for an additional 5 minutes until wilted.
- Blend the Soup:
- Using an immersion blender, blend the soup until smooth. If you don’t have an immersion blender, carefully transfer the soup to a blender in batches and blend until smooth. Return to the pot.
- Finish with Ginger:
- Stir in the minced ginger and lemon juice (if using) for an extra zing. Taste and adjust seasoning as needed.
- Serve:
- Ladle the soup into bowls and garnish with fresh parsley or cilantro. You can also add a drizzle of olive oil or a sprinkle of lemon juice for added flavor.
- Enjoy:
- Serve warm with crusty bread or pita on the side for a complete meal.
Tips:
- For a creamier texture, you can add a splash of coconut milk or cream before blending.
- This soup can be stored in the refrigerator for up to 3 days and freezes well for future meals.
Turmeric Noodle Soup with Greens
Ingredients:
- For the Soup:
- 4 cups vegetable broth (or chicken broth)
- 1 tablespoon olive oil
- 1 medium onion, diced
- 3 cloves garlic, minced
- 1 tablespoon fresh ginger, grated
- 1 tablespoon ground turmeric
- 1 teaspoon ground cumin
- 1 teaspoon ground coriander
- 1/2 teaspoon red pepper flakes (optional, for heat)
- 2 medium carrots, sliced
- 1 bell pepper, diced (any color)
- 1 cup mushrooms, sliced (shiitake or button)
- 1 cup cooked noodles (rice noodles, egg noodles, or your choice)
- 2 cups fresh greens (spinach, kale, or bok choy)
- Salt and pepper to taste
- Juice of 1 lime (for serving)
- For Garnish:
- Fresh cilantro or parsley, chopped
- Sliced green onions
- Lime wedges
- Sriracha or chili oil (optional)
Instructions:
- Sauté Aromatics:
- In a large pot, heat the olive oil over medium heat. Add the diced onion and sauté for about 5 minutes, until translucent.
- Stir in the minced garlic and grated ginger, cooking for an additional 1-2 minutes until fragrant.
- Add Spices:
- Sprinkle in the ground turmeric, cumin, coriander, and red pepper flakes (if using). Stir well to coat the onions and garlic with the spices, cooking for another minute.
- Build the Soup Base:
- Pour in the vegetable broth and bring the mixture to a gentle simmer. Add the sliced carrots, diced bell pepper, and mushrooms. Let the soup simmer for about 10-15 minutes, or until the vegetables are tender.
- Add Noodles and Greens:
- Stir in the cooked noodles and fresh greens. Cook for an additional 2-3 minutes until the greens are wilted and the noodles are heated through.
- Season:
- Taste the soup and season with salt and pepper as needed. Adjust the flavor with lime juice to brighten it up.
- Serve:
- Ladle the soup into bowls and garnish with fresh cilantro or parsley, sliced green onions, and lime wedges. Drizzle with Sriracha or chili oil if you like a bit of heat.
- Enjoy:
- Serve hot and enjoy your nourishing Turmeric Noodle Soup with Greens!
Tips:
- Feel free to customize the soup with your favorite vegetables or proteins, such as tofu or chicken.
- For a creamier texture, you can add a splash of coconut milk towards the end of cooking.
- This soup can be stored in the refrigerator for up to 3 days and can be frozen for longer storage. Just add fresh greens when reheating.
Smashed Fava Beans on Toast
Ingredients:
- 1 cup dried fava beans (or 2 cups fresh fava beans, shelled)
- 2 tablespoons olive oil, plus more for drizzling
- 1 garlic clove, minced
- Juice of 1 lemon
- Salt and pepper, to taste
- 1 teaspoon ground cumin (optional)
- Fresh herbs (such as parsley or mint), chopped, for garnish
- 4 slices of crusty bread (such as sourdough or ciabatta)
- Optional toppings: crumbled feta cheese, cherry tomatoes, or red pepper flakes
Instructions:
- Prepare the Fava Beans:
- If using dried fava beans, soak them in water overnight. Drain and rinse the beans, then place them in a pot with fresh water. Bring to a boil, then reduce the heat and simmer for about 45 minutes to 1 hour, or until tender. If using fresh fava beans, blanch them in boiling water for 2-3 minutes, then transfer to an ice bath. Remove the outer skins after cooling.
- Mash the Beans:
- Once the fava beans are cooked and tender, drain any excess water (if using dried beans) and transfer them to a mixing bowl. Add the minced garlic, olive oil, lemon juice, salt, pepper, and cumin (if using). Mash the mixture with a fork or potato masher until you reach your desired consistency—smooth or slightly chunky.
- Toast the Bread:
- While mashing the fava beans, preheat your oven to 400°F (200°C) or heat a grill pan over medium heat. Brush both sides of the bread slices with olive oil and toast them in the oven for about 10 minutes or on the grill pan until golden brown and crispy.
- Assemble the Toast:
- Spread a generous amount of the smashed fava bean mixture on each slice of toasted bread. Drizzle with additional olive oil and sprinkle with salt and pepper to taste.
- Garnish and Serve:
- Top with fresh herbs and any optional toppings you desire, such as crumbled feta cheese, halved cherry tomatoes, or a sprinkle of red pepper flakes for some heat. Serve immediately while the toast is still warm.
Roasted Asparagus Dreamlight Valley Style
Ingredients:
- 1 bunch of fresh asparagus (about 1 pound)
- 2 tablespoons olive oil
- 1 teaspoon garlic powder
- 1 teaspoon lemon zest
- 1 tablespoon fresh lemon juice
- 1 teaspoon sea salt
- 1/2 teaspoon black pepper
- 1/4 teaspoon red pepper flakes (optional for a bit of heat)
- 1/4 cup grated Parmesan cheese (optional for a cheesy twist)
- Fresh herbs for garnish (such as parsley or basil)
Instructions:
- Preheat the Oven: Preheat your oven to 400°F (200°C).
- Prepare the Asparagus: Rinse the asparagus under cold water and pat dry. Trim the tough ends of the asparagus by snapping them off or cutting about an inch from the bottom.
- Season the Asparagus: In a large bowl, combine the olive oil, garlic powder, lemon zest, lemon juice, sea salt, black pepper, and red pepper flakes (if using). Add the asparagus to the bowl and toss until they are evenly coated with the seasoning mixture.
- Roast the Asparagus: Spread the seasoned asparagus in a single layer on a baking sheet lined with parchment paper. Make sure they are not overcrowded to ensure even roasting.
- Bake: Roast in the preheated oven for about 15-20 minutes, or until the asparagus is tender and slightly crispy on the edges. If you’re using Parmesan cheese, sprinkle it over the asparagus during the last 5 minutes of roasting.
- Garnish and Serve: Once done, remove the asparagus from the oven and transfer it to a serving platter. Garnish with fresh herbs for a pop of color and extra flavor.
- Enjoy: Serve warm as a side dish or as part of a larger meal in true Dreamlight Valley style!
Tips:
- For an extra touch of Dreamlight Valley magic, consider adding a sprinkle of toasted nuts (like almonds or pine nuts) for added crunch.
- Pair this dish with grilled meats, pasta, or a fresh salad for a complete meal.
Frenched Green Beans with Garlic & Herbs
Ingredients:
- 1 pound fresh green beans, trimmed and frenched
- 3 tablespoons olive oil
- 4 cloves garlic, minced
- 1 teaspoon fresh thyme leaves (or 1/2 teaspoon dried thyme)
- 1 teaspoon fresh rosemary, chopped (or 1/2 teaspoon dried rosemary)
- 1 teaspoon fresh parsley, chopped (for garnish)
- Salt and pepper to taste
- Zest of 1 lemon (optional)
- Juice of 1/2 lemon (optional)
Instructions:
- Prepare the Green Beans:
- Rinse the green beans under cold water and trim the ends. Use a knife to french the beans by cutting them into 1-2 inch pieces, ensuring they have a nice, elegant look.
- Blanch the Green Beans:
- Bring a large pot of salted water to a boil. Add the frenched green beans and cook for about 3-4 minutes, or until they are bright green and tender-crisp.
- Immediately transfer the beans to a bowl of ice water to stop the cooking process. Let them cool for a few minutes, then drain and set aside.
- Sauté the Garlic and Herbs:
- In a large skillet, heat the olive oil over medium heat. Add the minced garlic and sauté for about 1 minute, or until fragrant and lightly golden (be careful not to burn the garlic).
- Add the thyme and rosemary to the skillet, stirring to combine.
- Combine and Cook:
- Add the blanched green beans to the skillet. Toss to coat them in the garlic and herb mixture. Sauté for an additional 3-5 minutes, allowing the beans to heat through and absorb the flavors.
- Season with salt and pepper to taste. If desired, add the lemon zest and juice for a fresh, zesty finish.
- Serve:
- Transfer the green beans to a serving dish. Garnish with chopped parsley for a pop of color and extra flavor. Serve warm as a delightful side dish to complement your main course.
Garlicky Stir-Fried Pea Sprouts
Ingredients:
- 1 pound fresh pea sprouts, rinsed and trimmed
- 3 tablespoons vegetable oil (or sesame oil for added flavor)
- 4 cloves garlic, minced
- 1 tablespoon soy sauce (or tamari for gluten-free)
- 1 teaspoon sesame oil (optional, for finishing)
- Salt and pepper to taste
- 1 teaspoon red pepper flakes (optional, for heat)
- 1 tablespoon toasted sesame seeds (for garnish)
- Lemon wedges (for serving)
Instructions:
- Prepare the Ingredients: Rinse the pea sprouts thoroughly under cold water and trim any tough stems. Mince the garlic and set aside.
- Heat the Oil: In a large skillet or wok, heat the vegetable oil over medium-high heat. If using sesame oil, you can mix it with the vegetable oil for added flavor.
- Sauté the Garlic: Once the oil is hot, add the minced garlic to the skillet. Stir-fry for about 30 seconds, or until fragrant, being careful not to let it burn.
- Add the Pea Sprouts: Add the pea sprouts to the skillet. Stir-fry for 2-3 minutes, or until they are bright green and just tender. The sprouts should still have a bit of crunch.
- Season: Drizzle the soy sauce over the pea sprouts, and if you like a bit of heat, add the red pepper flakes. Toss everything together to ensure the sprouts are evenly coated. Season with salt and pepper to taste.
- Finish: If using, drizzle the sesame oil over the stir-fried pea sprouts and give it one last toss.
- Serve: Transfer the garlicky stir-fried pea sprouts to a serving dish. Garnish with toasted sesame seeds and serve with lemon wedges on the side for a fresh squeeze of juice.
Tips:
- For added protein, you can toss in some cooked tofu or shrimp during the last minute of cooking.
- This dish pairs well with steamed rice or noodles for a complete meal.
- Feel free to customize with other vegetables like bell peppers or carrots for added color and nutrition.
Grilled Chicken with Parsi Green Chutney
Ingredients:
For the Marinade:
- 1 cup Parsi Green Chutney
- 1 lb (450g) boneless, skinless chicken thighs or breasts
- 2 tablespoons lemon juice
- 1 teaspoon salt
- 1 teaspoon black pepper
- 1 teaspoon cumin powder (optional)
the Salad:
- 4 cups mixed greens (spinach, arugula, lettuce)
- 1 cup cherry tomatoes, halved
- 1 cucumber, diced
- 1/2 red onion, thinly sliced
- 1/4 cup feta cheese, crumbled (optional)
- 1/4 cup olives (optional)
the Dressing:
- 2 tablespoons olive oil
- 1 tablespoon lemon juice
- Salt and pepper to taste
Instructions:
- Marinate the Chicken:
- In a large bowl, combine the Parsi Green Chutney, lemon juice, salt, black pepper, and cumin powder (if using).
- Add the chicken pieces to the marinade, ensuring they are well coated. Cover and refrigerate for at least 1 hour, or preferably overnight for maximum flavor.
- Prepare the Grill:
- Preheat your grill to medium-high heat. If using a grill pan, heat it over medium-high heat on the stovetop.
- Grill the Chicken:
- Remove the chicken from the marinade and let any excess marinade drip off.
- Place the chicken on the grill and cook for about 6-7 minutes on each side, or until the internal temperature reaches 165°F (75°C) and the chicken is nicely charred.
- Once cooked, remove the chicken from the grill and let it rest for a few minutes before slicing.
- Make the Salad:
- In a large bowl, combine the mixed greens, cherry tomatoes, cucumber, red onion, feta cheese, and olives.
- In a small bowl, whisk together the olive oil, lemon juice, salt, and pepper to create the dressing.
- Drizzle the dressing over the salad and toss gently to combine.
- Serve:
- Slice the grilled chicken and serve it on top of the salad. Drizzle additional Parsi Green Chutney over the chicken for extra flavor.
- Enjoy your delicious grilled chicken with fresh salad!
FAQ
Lean and green recipes are meals built around lean protein sources and green vegetables.
They focus on balanced nutrition, controlled calories, and simple ingredients that support energy and overall health.
Yes, Lean and green recipes are naturally low in calories and high in protein and fiber.
This helps you feel full longer and reduces unnecessary snacking, making them effective for healthy weight management.
Final Thoughts: Why Lean and Green Recipes Truly Matter
Lean and green recipes are more than a healthy eating approach.
They represent a smarter, more intentional way to nourish your body.
By focusing on lean proteins, fresh greens, and simple cooking techniques, these meals support energy, balance, and long-term wellness without feeling restrictive.
They fit real life. Busy schedules. Real kitchens. Real people.
What makes lean and green recipes stand out is their flexibility.
They can be comforting or light. Simple or creative.
And they adapt easily to your preferences, whether you cook daily or just want better choices during the week.
If you’re looking for meals that feel good now and support your health later, this is a place to start.
Choose one recipe. Make it your own. Share it with someone you care about.
Small changes in the kitchen often lead to the biggest changes in how we feel.

Taylor Green
Taylor Green writes about balanced eating, meal planning, and evidence-based nutrition tips. Their goal is to make healthy eating simple and achievable for everyone.
- Taylor Green

- Taylor Green
- Taylor Green
- Taylor Green


Mia Cook
Mia Cook creates simple, healthy, and delicious recipes. From quick snacks to full meals, her recipes are designed for busy lifestyles and home cooks.
- Mia Cook
- Mia Cook
- Mia Cook
- Mia Cook